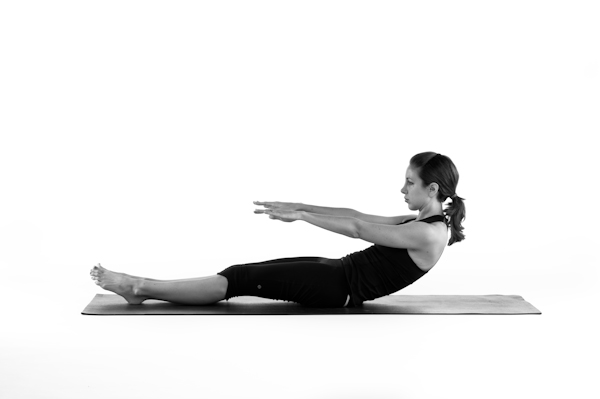
Roll Up Exercise
What You Need to Know about the Roll-Up Exercise
In particular, the Roll-Up gives the joints and muscles of your spine and back a valuable “massage” that stimulates your circulation and the portion of your nervous system housed in the spinal column. This massaging action helps the Roll-Up promote the essential mind/body connection that’s such an important benefit of the Pilates method of conditioning.Joseph Pilates devised the Roll-Up to promote deep, healthy Pilates breathing, making it an important tool for oxygenating your blood and improving your circulation, as well as to strengthen the Powerhouse muscles, and to build a strong, flexible, and well-aligned spine.
The Roll-Up is similar to an old-fashioned style of sit-up, but it emphasizes stretching and articulating your spine, rather than heaving your torso off the floor. In a basic Roll-Up, you lie flat on a workout mat with your legs straight and your arms and hands extended above your eyes. In most versions of the Roll-Up, you hold a bar or rod in your hands, and with straight arms you slowly roll your spine up and forward, one vertebra at a time, stretching your head and arms toward your toes while you maintain your scooped belly. As you reverse, you once again scoop your abdominals in and up the front of your spine and articulate vertebra by vertebra until you return to the original position. With each repetition of the Roll-Up, your spine is more flexible and your abdominals are stronger than before.
What the Roll-Up Does
As mentioned earlier, the Roll-Up offers a number of important physical and mental benefits:- It is a key part of any Pilates warm-up, and it’s especially effective for promoting deep, healthy breathing and getting your spine and legs ready for the Pilates work ahead.
- It is also an important Pilates tool for articulating the spine and increasing its strength and flexibility.
- It gives the muscles and joints of your spine a massage, promoting increased circulation, and awakening your nervous system.
- It stretches tight hamstrings and muscles in the calves, neck, and armpits, while it promotes strong, flexible hip joints.
- It increases shoulder range of motion, strength, and flexibility
Tips and Precautions for Doing the Roll-Up
The Roll-Up is a safe, effective exercise, but you do need to keep a few things in mind as you’re learning the proper Roll-Up technique:- Be sure to use your belly muscles (scooping them in and up along the front of your spine) to lift your head, spine, and arms up and over toward your feet; do not overuse your back.
- Keep your arms and wrists straight but not locked as you reach forward with them. This will help alleviate any strain on your shoulders and neck.
- Make your movements sequential and smooth, yet strong. Don’t heave your torso up. You may find that one area of your spine is less flexible than the rest. To keep your Roll-Up smooth and flowing, try timing your exhalation at different points in the Roll-Up to give your abdominal muscles more uniform strength as you lift the less-flexible portion of your spine from the floor. If you exhale at the most difficult moment of your curl, you can gain more articulation there.
- Tight muscles need to be coaxed and massaged, not strained and pulled. Use the exercise to stretch your back and hamstrings gently over time. You aren’t competing with anyone to see how far you can stretch toward your toes.
- Remember to reach forward with your head and spine as well as your hands. Don’t strain your neck or shoulders.
The Ultimate Version of the Roll-Up
When you’ve mastered the basic intermediate version of the Roll-Up, you’re ready to try some advanced modifications. Here are some ideas for taking the Roll-Up to new levels:- Gradually lower the starting position of the bar and arms until you can lay them flat on the mat above your head. Keep your shoulders wide and flat, and don’t allow your ribcage to arch off the mat.
- Next, begin the Roll-Up by raising your arms until they are perpendicular to the floor, curl your head and shoulders off the mat until your head is between your arms, and then continue to roll up and down. Keep your head between your arms the entire time until your arms are again perpendicular to the floor. To finish, lower your shoulders and head, then reach your arms back to the mat above your head.
- Finally, curl your head, shoulders, and arms simultaneously Keep your arms next to your head throughout the entire exercise, but (especially at the beginning and end) remember that your shoulders must remain relaxed down away from your ears and you still have to articulate one vertebra at a time! Keep your legs firmly anchored together and reaching down along the mat.


0 comments: